Add DSpace User in your System
root@localhost nurahammad~]#useradd dspace
Install prerequisite software
root@localhost nurahammad~]# yum install java-1.6.0-openjdk -y
root@localhost nurahammad~]# yum install tomcat6
root@localhost nurahammad~]# yum install postgresql postgresql-server postgresql-contrib
root@localhost nurahammad~]# service postgresql initdb
root@localhost nurahammad~]# yum install ant ant-nodeps
[root@localhost nurahammad]# /etc/init.d/postgresql start
Configure Postgres to listen localhost
[root@localhost nurahammad]# nano /var/lib/pgsql/data/postgresql.conf
listen_addresses = ‘localhost’ # what IP address(es) to listen on;
[root@localhost nurahammad]# nano /var/lib/pgsql/data/pg_hba.conf
# TYPE DATABASE USER CIDR-ADDRESS METHOD
# IPv4 local connections:
host dspace dspace 127.0.0.1/32 trust
# “local” is for Unix domain socket connections only
local all all trust
Manually Download maven and Install. Maven is not in Default Centos-6.3 source
[root@localhost nurahammad~]# wget http://mirrors.ispros.com.bd/apache/maven/maven-3/3.0.4/binaries/apache-maven-3.0.4-bin.tar.gz
[root@localhost nurahammad]# tar -zxvf apache-maven-3.0.4-bin.tar.gz
[root@localhost nurahammad]# mv apache-maven-3.0.4 /usr/local
[root@localhost nurahammad]# cd /usr/local/
[root@localhost local]# ln -s apache-maven-3.0.4 maven
[root@localhost local]# nano /etc/profile
export M2_HOME=/usr/local/maven
export PATH=${M2_HOME}/bin:${PATH}
Create Database user and Database for DSpace
[root@localhost nurahammad]# su postgres
bash-4.1$ createuser -U postgres -d -A -P dspace
bash-4.1$ exit
[root@localhost nurahammad]# su dspace
[dspace@localhost nurahammad]$ createdb -U dspace -E UNICODE dspace
Download DSpace and configure
[root@localhost nurahammad]# wgethttp://garr.dl.sourceforge.net/project/dspace/DSpace%20Stable/1.8.2/dspace-1.8.2-src-release.tar.gz
[root@localhost nurahammad]# tar -zxvf dspace-1.8.2-src-release.tar.gz
[root@localhost nurahammad]# cd dspace-1.8.2-src-release/dspace
[root@localhost dspace]#nano config/dspace.cfg
Build DSpace
[root@localhost dspace]# mvn package
Install DSpace
[root@localhost dspace]# cd target/dspace-1.8.2-build/
[root@localhost dspace-1.8.2-build]# ant fresh_install
[echo]
[echo] ====================================================================
[echo] The DSpace code has been installed, and the database initialized.
[echo]
[echo] To complete installation, you should do the following:
[echo]
[echo] * Setup your Web servlet container (e.g. Tomcat) to look for your
[echo] DSpace web applications in: /dspace/webapps/
[echo]
[echo] OR, copy any web applications from /dspace/webapps/ to
[echo] the appropriate place for your servlet container.
[echo] (e.g. ‘$CATALINA_HOME/webapps’ for Tomcat)
[echo]
[echo] * Make an initial administrator account (an e-person) in DSpace:
[echo]
[echo] /dspace/bin/dspace create-administrator
[echo]
[echo] * Start up your servlet container (Tomcat etc.)
[echo]
[echo] You should then be able to access your DSpace’s ‘home page':
[echo]
[echo] http://localhost:8080/xmlui
[echo]
[echo] You should also be able to access the administrator UI:
[echo]
[echo] ====================================================================
[echo]
BUILD SUCCESSFUL
Total time: 1 minute 46 seconds
[root@localhost dspace-1.8.2-build]# nano /etc/tomcat6/server.xml
Change this section
<Host name=”localhost” appBase=”webapps”
unpackWARs=”true” autoDeploy=”true”
xmlValidation=”false” xmlNamespaceAware=”false”>
<Host name=”localhost” appBase=”webapps”
unpackWARs=”true” autoDeploy=”true”
xmlValidation=”false” xmlNamespaceAware=”false”>
As the following
<Host name=”localhost” appBase=”/dspace/webapps”
unpackWARs=”true” autoDeploy=”true”
xmlValidation=”false” xmlNamespaceAware=”false”>
<Host name=”localhost” appBase=”/dspace/webapps”
unpackWARs=”true” autoDeploy=”true”
xmlValidation=”false” xmlNamespaceAware=”false”>
Then create DSpace Administrator account
[root@localhost dspace-1.8.2-build]# /dspace/bin/dspace create-administrator
Creating an initial administrator account
E-mail address: nurahammad@iub.edu.bd
First name: Nur
Last name: Ahammad
WARNING: Password will appear on-screen.
Password:Password
Again to confirm: Password
Is the above data correct? (y or n): y
Administrator account created
Set Permission and ownership for DSpace
[root@localhost nurahammad]#chmod -R 755 /home/dspace/
[root@localhost nurahammad]#chown -R dspace:dspace /home/dspace/
Finally you can get your Dsapce by pointing the address in your web browser:
OR



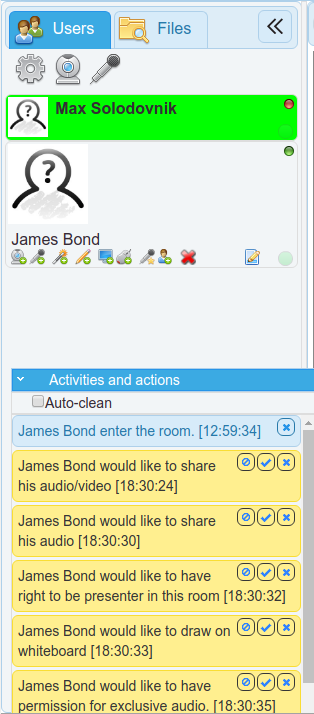
 Allow/Deny moderation
 Allow/Deny to draw on white board
 Allow/Deny screen-sharing/record screen
 Allow/Deny Remote Control Screen
 Give exclusive audio to others or self
 (Re-) Start Audio, Video or Device settings


